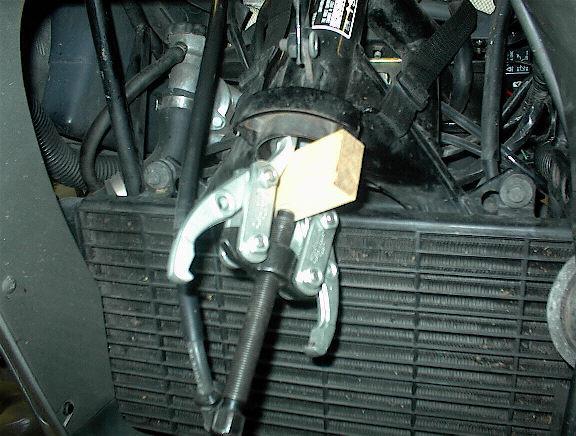
Pulling Lower Race
Lower Race Out (showing how the puller jaws engaged the race)
The Honda ST1100 service manual gives all the basic information to enable you to do this job, but a more thorough description of the procedure might make it easier for you. Eric Russell did a nice write-up which I'm including below. I consider Eric's work to be recommended reading. Eric's splitting the old races with a Dremel was a new idea to me, and I'll certainly use that approach in the future.
Here are three pictures to help explain how I removed the steering stem bearing races.
The instructions from the Haynes manual were adequate. You may want to make notes (or take pictures) so that you can get the cables, wires, & hoses routed correctly on reassembly.
In addition to typical mechanic tools you will need 5mm, 6mm, & 8mm hex drivers. Allen wrenches will work but hex drivers are required if you want to use a torque wrench on reassembly (highly recommended). The ignition switch is bolted to the underside of the top triple tree with two Torx bolts. Removal of the ignition switch is not required for this job but it helped to get things out of the way. Haynes mentioned disconnecting the wires somewhere below the air filter housing. I just unbolted the ignition switch. You will need a T40 Torx driver.
Haynes will remind you to loosen the upper fork clamp bolt then loosen but do not remove the fork top bolt. This is because it will be difficult to hold the fork tube and loosen the top bolt after the fork is out. If you are not disassembling the forks you need not loosen the fork top. For early models - (if you are planning to drain/refill the forks) you will need a 17mm hex driver. I obtained one 'on loan' from the STOC (see below). Later models need a large socket or wrench - I do not know the exact size. If you are removing springs it is helpful to make a damper rod holding tool. Get a long (~ 6") 10mm X 1.0 pitch bolt plus two nuts. Thread both nuts on the bolt. Position them such that the nut furthest from the head of the bolt is 1/2 on the bolt. Tighten the other nut against this nut. When you disassemble the fork with the damper rod (right fork on early models, left fork on later models) use this tool by threading the exposed nut onto the top of the damper rod.
Honda makes a special socket that fits the bearing adjustment nut. I obtained one on loan from fellow STOC-er John Oosterhuis. (There are others who make the same offer - pay the postage both ways, they loan you the tool.) If you have a pin spanner wrench that would work fine. Honda specifies a torque value for the bearing adjustment nut but most tighten/adjust by feel - tight enough for no slop, not so tight as to impede free movement.
Once the front end is disassembled the biggest problem will be removing the old bearing races. The bearings on my bike (1991 with 20,000 miles) looked good but felt 'notchy'. It was disheartening to find the bearing were almost devoid of grease. I am not the original owner but I feel it is unlikely they have been out before. Perhaps a good cleaning and repacking would have sufficed but, since I had new 'roller' bearings in hand, my intent was to replace them.
There are three races you will need to remove. The upper inner race will come out when the adjusting nut is removed. The upper & lower outer races are an interference fit in the frame. A long drift (~ 12") will catch the edge of the upper race allowing you to tap it out from below. Work slowly around the circumference and it will pop out. The lower race is harder to reach in the same way - the bottom of the frame's steering head is a larger diameter, thus the edge of the lower race cannot be 'caught' by a long drift from above. Possibly a bent screwdriver might work. I used a gear puller as shown in the pictures labeled "pulling lower race" & "lower race out".
Haynes suggests using a pair of screwdrivers to lever off the lower inner race. No way would this work for me. I have a hydraulic press but I did not have a fitting to grasp the race and remove it. I really don't see how this can be done at home. I ended up bringing the steering stem to a Honda dealer and paying them to remove the lower race. I suspect if I had been aware of the need for help with this part, I could have located a machine shop that might have done the job cheaper. However, it was 4:00pm on a Friday and I didn't want to be stuck all weekend with my bike apart.
Pulling Lower Race |
|
Lower Race Out (showing how the puller jaws engaged the race) |
|
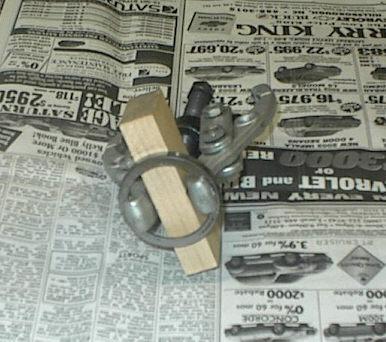
Now that you have all the bearing races out, it is time to install the new. Plan ahead and put the new outer races in the freezer overnight. The theory is that the cold will slightly reduce the diameter of the race, allowing an easier fit into the frame. It is important that you only apply force to the outer diameter of the outer races. Here is the method that I employed: I use a cutting disc in a Dremel tool to split the old races. See picture labeled "split races". This allowed me to use the old race to press in the new. They are the correct diameter to apply force only on the outer edge, the split prevents the old race from getting 'stuck' in the frame. I use a hardwood block and large ball peen hammer to drive them in. You can tell when they are seated by a change in the sound as you hammer.
Split Races |
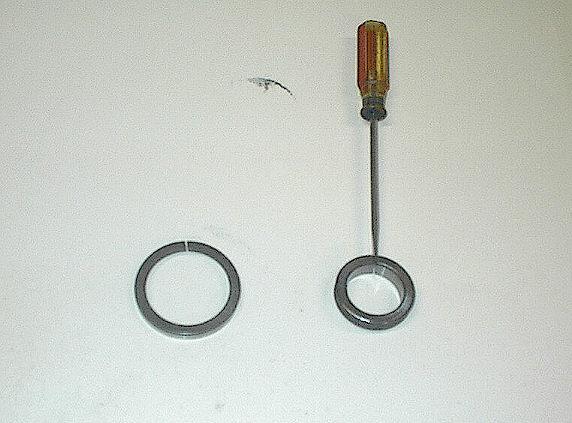 |
To install the lower inner race use the same technique. Put a new dust seal followed by the new lower inner race in position on the steering stem. Position the split race upside down such that its inner edge bears on the inner edge of the new race. I then used a length of 1 1/4" steel pipe and large hammer to drive the new race into position. Do this on something solid. I rested the bottom of the steering stem on a hardwood block on top of my heavy, cast iron table saw. There is a plastic plug in the bottom of the steering stem. It is merely a press fit. Remove it so the hammering doesn't damage it. In the picture "split races" the small screwdriver is wedged into the cut, slightly increasing its diameter. This allowed me to remove the old race after using it to drive in the new.
From this point on it is the old "reassembly is the reverse of disassembly".
There are a couple of things I did differently. Maybe they'll work for you:
1. I didn't use a puller to remove the lower race from the frame. Eric suggested a bent screwdriver might do the trick. What I used was a 15 inch piece of concrete reinforcing bar, 1/2" diameter. I put a bend of about 30 degrees 5 inches from the end. I then ground that end so it would get a good purchase on the lower race. Inserting the bar from the top with the ground lower tip engaging the lower race, the bar can lean against the opposite wall of the neck of the frame. Then I hammered the bearing race free, moving the contact point about 45 degrees at a time around the circumference of the race between blows. Here are some pictures.
2. To remove the lower race from the steering stem, I used cold chisels to work the race free. First, direct the tip of a chisel under the bearing, along a radius of the race. Work your way around a bit at a time. (Of course, the lower seal will be destroyed.) When the race has been moved upward about 3/16" or so, use two chisels, wedging them under the race in a tangential direction on opposite sides of the race. Drive them progressively, with the flat sides of the chisels seated against the surface underneath the race. Depending upon how thick your chisels are, you will be able to move the race up the shaft quite a ways. Then you will be able to get a drift under the race and finish the job. Alternately, for this last part, you may cut most of the way through the race with a Dremel tool (don't nick the steering stem) and then split the race with a screwdriver blade driven into the kerf. You may have to do this more than once before the race is fully removed. Wrap a shop rag around the race and use serious eye protection for this, because shattered bits may go flying! Someone I know ended up with a bit embedded in his cheek.
For tips on adjusting the bearing pre-load, go here.
[ Top of Page ]
Last updated on February 10, 2014 © 2003-2014 M. E. Martin, All rights reserved