Close-up of components that need lubrication

Missing shifts? Mark Frost prepared the following write-up:
"Had an hour or so Saturday waiting out the rain, and got into one of those quality garage time modes. Decided to check the shifter and linkage, as last time I was out, it took a bit more effort than normal to row the boat. I was putting too much effort into it, I guess, and it didn't feel right.
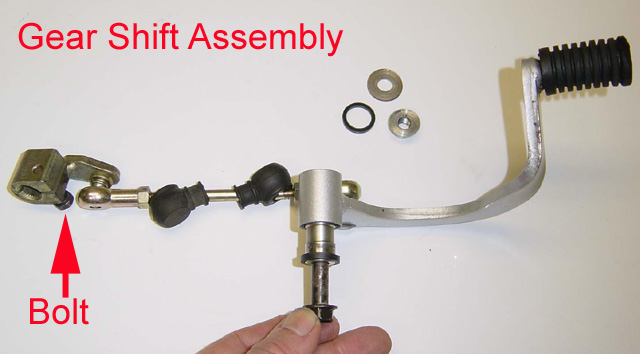
"Grabbed a couple of 12mm box wrenches, a 10mm socket and extension, and had that puppy out of there in five minutes flat. The shifter rides on a drilled centerpiece secured by a bolt/washer/self-locking nut that's run through a frame bracket. Small grease/grit seals sit at either end of this assembly, where everything cinches down. The linkage itself is the standard ball-socket and arm type with adjustable screws for lever height, with rubber booties to keep everything clean. Certainly functional enough, and reasonably weather-proof.
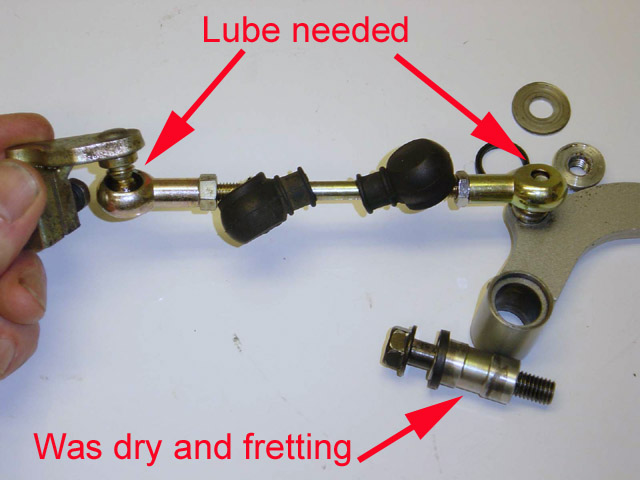
"I figured that a quick shot of waterproof grease around the bolt would do the trick, and I'd be on my way. Then, I looked more carefully...there wasn't hardly any grease to be found anywhere on this thing. Not good. I stripped the entire assembly, and used Belray waterproof grease on the centerpiece (which has a waisted mid-section, btw, and was totally dry) and pivot bolt, and white lithium grease on the ball sockets. Finished up with shots of silicone spray inside and outside on the booties, and then remounted the whole thing (be sure to pay attention to the large "key" slot on the engine shifter shaft, as this has to align with the same spot on the linkage clamp).
"Damn, shifting has never been better. Talk about a difference. You guys with balky levers have got to try this -- it works."
Michael Moore added the following comments and pictures. Thanks, Michael!
I decided to take the shifter assembly off my moto (2001 ST1100A with 70,000 km) and have a look.
Sure enough, I had the same problems that Mark described - bone-dry bushings and linkages, considerable abrasion and fretting due to the lack of lubricant, and tons of crud (road grime)inside places where it should not be.
I have posted some pictures below that might make his original write-up easier to follow. It is not difficult to remove the shifter assembly - you will need two 12 mm box end wrenches to remove the bolt and nut on the left side of the bike (sockets won't fit in there, and you can reasonably expect the bolt and nut to be corroded and difficult to remove). The connection to the transmission comes off easily with a 10 mm socket. It is simplest to remove the transmission connection first - with a helper pushing down on the shifter, to make access to the bolt easiest - then remove the pivot bolt second.
No recalibration of the linkage is needed, you just clean everything, lubricate everything (I used the Honda Moly 60 paste everywhere), then put it back together.
Shifter Assembly - the bolt I am holding onto was badly corroded. The other bolt that needs to be removed to drop the assembly off the bike is at the far left

Close-up of components that need lubrication

You may have noticed that Mark used grease while Michael used Moly Paste. I used moly grease on my bike. YMMV
Last updated on January 28, 2014 © 2001-2014 M. E. Martin, All rights reserved