

| The ST1100 with 41mm forks has a drain screw at the bottom of each slider. The 6mm x 1.0 mm threaded plug uses a metal washer for sealing. The drain port makes it possible to drain the forks without removing them from the motorcycle, but its design makes for a messy experience. Here's a way to make a bleeder screw to make the process a bit neater. When you're finished draining and flushing the forks, you'll have to reinstall the original plug. | |
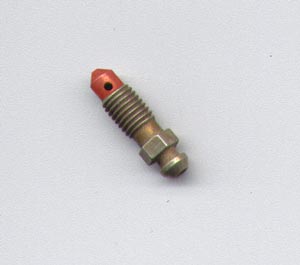
| I found on the Speedbleeder web site http://www.speedbleeder.com/size.htm a part called SB6100 which has the correct threads for our needs. You can purchase one of these, or you can go to a local motorcycle dealer's parts counter and purchase a brake bleeder screw with the same threads. The check valve feature of the Speedbleeder is unnecessary here, and would make gravity draining of the forks impossible. (You could probably just drive this mechanism out with a punch inserted into the end where you cut it off.) According to the Speedbleeder application chart here, there are a number of BMW models which the SB6100 fits, so the BMW factory original part will do nicely for our purposes. Not having either of these parts to work with, I show a photo of a similar item with 1/4-28 threads that I had in my garage. Simply cut off the portion I have highlighted in red. Then put a layer of Teflon pipe sealant tape on the threads. Screw this part into the drain hole a few turns with your fingers. Now you can slip a piece of vinyl or rubber tubing over the tip of the screw and let the fork oil drain into a container. Or you could use a Mityvac brake bleeder device to speed up the process. You will, of course, have to remove the fork caps. |  |
| That was the easy way out. What follows is the hard way to go. Before I researched the info in the previous paragraph, I had made a part from an old Yamaha engine case screw, but subsequently lost it. I decided to make up another one and show you how to do it. This photo shows three screws I started with. The top one is another steel Yamaha screw. The bottom one is a steel part I bought at a hardware store marked as material grade 8.8. The center part is a screw, nut and washer that came with a motorcycle battery. After I broke several drill bits trying to work with the steel screws, I gave one last try working with the battery screw. It turns out that this part is made of brass. This is much easier to machine, and the job went smoothly. |  |
| I needed a way to hold the screw while I drilled it using my drill press. First I drilled a 7/32" hole in a block of wood. This was a snug fit for the 6mm screw, which was then tightened into the hole. |  |
| All drilling complete. The Phillips recess in the screw head made it easy to visually align the drill bit with the screw center. I first drilled through with a 5/64" bit, and followed with one of 3/32" diameter. I was surprised to see the golden color of the drill shavings. The brass screw is apparently plated with a gray colored material. |  |
| I then chucked the screw into the drill press (not too tight, don't ruin the screw threads) and used a hacksaw to cut the spinning screw as close to the underside of the head as possible. |  |
| Another view after cutting off the screw head. You can see the hole is well centered at this end. The other end is a little bit off-center. That's the reason this is the end of the screw you want to rework in the next step. |  |
| I then chucked the screw into a hand-held drill and used a flat file to remove the threads for half the length of the screw. Then I used the edge of a thin flat file (about 3/16" thick) to cut a recess as you can see. A taper was formed on the tip. Before using, I wrap a bit of Teflon pipe sealant tape on the threads. That's all folks! |  |
[ Top of Page ]
Last updated on January 27, 2014 © 2004-2014 M. E. Martin, all rights reserved.